How To: Repair a Burst Pipe

Cold, freezing temperatures in the winter could mean major damage to your plumbing system if the right precautions are not taken. Ben Goheen from The Neighborhood Plumber is a master plumber of 15 years, and he finds that SharkBite Max is the most reliable way to quickly repair a burst pipe.
Why Do Pipes Burst?
Pipes burst when the water in the plumbing system freezes and expands to the point of busting the pipe open. This happens mostly to copper and CPVC pipes since they are rigid pipes with no flexibility to expand and contract.
For a more reliable pipe during freezing conditions, use SharkBite PEX pipe. This pipe is more flexible than copper or CPVC and can expand more easily with the freezing and thawing of water in the system.
Read More: 10 Facts About PEX Pipe You Need to Know
How to Prevent Pipe Bursts
Know your system. When emergencies happen, it’s important to know your home and how to properly shut off the water. This will make solving plumbing issues much smoother and safer. Locate your main water shut-off, outside faucet and valve to shut them off. If you are going out of town during the cold winter months, we suggest turning the water off and draining the system to prevent pipe bursts.
Climate-controlled environment. Pipe bursts are more common in homes that are not completely climate controlled. This leaves some pipes vulnerable to freezing conditions. Pipes are also likely to burst if you turn the heat off for a long time, leaving the entire house susceptible to frozen water in the plumbing system. To prevent pipe bursts, keep your thermostat at a comfortable temperature, no lower than 55° F. For added protection, keep the cabinet doors under your sinks open to expose the pipes to warm air.
Water movement. Letting the water run through the plumbing system allows for movement in the system, which reduces the likelihood of water freezing in the pipe. Keep water moving by letting the faucet drip until the cold spell passes.
Read More: Winterizing Tips: 6 Ways to Help Your Customers Prevent Frozen Pipes
Why SharkBite Max is Perfect for Pipe Repairs
To fix a burst pipe, you could solder the copper pipe or use compression fittings. Although these are viable options, they come with challenges that would make installation slower.
Soldering. Since you can only solder copper pipes, this method could not help you if your CPVC pipes burst. Not only is it not versatile, but soldering is also more time-consuming and dangerous compared to other repair methods. Working with open flames is also not ideal for tight spaces, as seen in this repair.
Since there are no open flames when you use SharkBite Max, there is no risk of starting fires or burning yourself. These fittings are safe and easy to use, making the installation process faster than traditional methods.
Compression fitting. These fittings are less dangerous than soldering but are not ideal in tight spaces. This is because of the bulky tools required for this installation method, which can slow down your installation time and take you longer to move on to the next job.
SharkBite Max does not require any special tools, and with half the insertion effort compared to the 1st generation of fittings, you can easily move from job to job.
Repairing the Pipe
1. Water and power shut-off
First, locate the power to your water heater and shut it off. This will prevent your water heater from burning the elements inside. Then, locate your main water shut-off and turn the system completely off. We recommend installing a SharkBite ball valve for water shut-off, which will clearly indicate if the water is shut off. Then, locate the outside faucet and drain the system.
Read More: How to Turn Off Main Water Valve for Plumbing Repairs
2. Cut the pipe
Using the appropriate pipe cutters for your pipe type, cut around the damaged portion of the pipe squarely and evenly. Allow for 2 to 3 inches of space between existing fittings and your SharkBite Max fitting. This will allow plenty of space for inserting, or removing, the coupling.
Cut 5 inches in each direction from the burst site, removing at least 10 inches of pipe from the system. This ensures all possible weak pipe is removed. When choosing where to cut, avoid areas where ceiling elements are resting on the pipe, or anywhere the piping is too crowded.
Then, measure the amount of replacement pipe you will need, including the length for the proper SharkBite Max insertion depth as well as the ½ in. of space of the fitting that is between both ends of the coupling.
3. Deburr
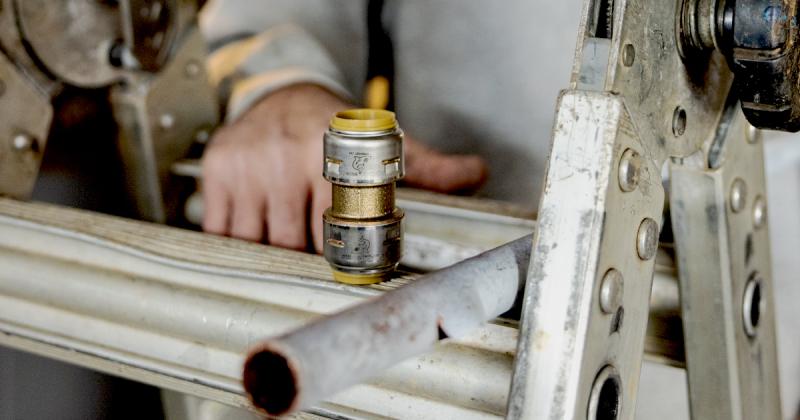
With SharkBite Max fittings, clean and debris-free pipes are vital. Ensure that your pipe is completely free of any copper shavings, burrs, paint, dirt or anything that could damage the o-ring in the fitting. For copper pipes, use an emery cloth to sand down the pipe if the outside of the pipe is rough. Then, use the SharkBite deburr and gauge tool to deburr the pipe for a smooth edge.
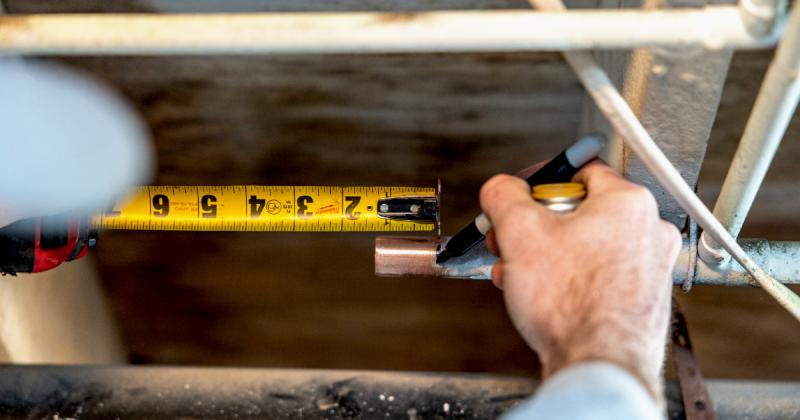
4. Mark
Mark the pipe according to the insertion depth chart using a tape measure. This will give you a definite line when you insert the fitting, indicating when the coupling has been completely connected.
| SharkBite Fitting Size | Nominal Pipe Size | Pipe OD | SharkBite 1st Generation Insertion Depth | SharkBite Max Insertion Depth |
|---|---|---|---|---|
| 1/4 in. | 1/4 in. CTS | 3/8 in. | 13/16 in. (21 mm.) | |
| 3/8 in. | 3/8 in. CTS | 1/2 in. | 15/16 in. (24 mm.) | |
| 1/2 in. | 1/2 in. CTS | 5/8 in. | 15/16 in. (24 mm.) | 1 in. (25 mm.) |
| 5/8 in. | 5/8 in. CTS | 3/4 in. | 1-1/8 in. (29 mm.) | |
| 3/4 in. | 3/4 in. CTS | 7/8 in. | 1-1/8 in. (28 mm.) | 1-1/4 in. (32 mm.) |
| 1 in. | 1 in. CTS | 1-1/8 in. | 1-5/16 in. (33 mm.) | |
| 1-1/4 in. | 1-1/4 in. CTS | 1-3/8 in. | 1-7/8 in. (48 mm.) | |
| 1-1/2 in. | 1-1/2 in. CTS | 1-5/8 in. | 2-1/16 in. (52 mm.) | |
| 2 in. | 2 in. CTS | 2-1/8 in. | 2-3/16 in. (56 mm.) |
5. Measure, cut and deburr new pipe
Measure the new pipe, accounting for the amount you need for the insertion depth, space on the fitting, and the length of the pipe needed between cut ends. Cut the pipe squarely and evenly and deburr with the SharkBite deburr tool. Ensure that the pipe is clean and free of any debris, including copper shavings.
6. Install SharkBite Max
When the new pipe is ready to go, push a SharkBite Max fitting onto the new pipe, meeting the insertion depth mark. Then, push a SharkBite Max fitting onto the existing pipe on the other side. Bring the new pipe to the existing and ensure both fittings are properly connected to the pipes. Then, check the depth marks.
Watch: How To: Install SharkBite Max Fittings
7. Turn the water and power on and check the system
First, turn the water source back on slowly to avoid hammering and cavitation. Then, open the outdoor faucet to let air out of the system. After the water is turned back on, you can turn the power back on to your water heater. Ensure there are no leaks before leaving the site.