How To: Increase Hot Water Capacity

If you’ve been running out of hot water quickly, consider using a Cash Acme Tank Booster PRO Thermostatic Mixing Valve (TMV) before buying a new water heater. This TMV extends the life of your water heater, and using other solutions within RWC’s family of brands, installation is fast, easy, and reliable.
Cash Acme’s Tank Booster PRO Thermostatic Mixing Valve is designed to double your hot water capacity by using source-point temperature control. With it, you can set the tank to 140°F, which destroys bacteria like legionella, and the valve will mix cold water to meet an anti-scald output of 115°F to 120°F.
The Tank Booster PRO kit includes:
- Thermostatic mixing valve
- Union connector for water heater
- Cold water tee
- Temperature gauge (24643/24644 only)
- 18 in. corrugated (24639/24643) or braided hose with integrated strainers & washers (24832/24644)
The Tank Booster PRO is compatible with SharkBite flexible water heater connectors & ball valves for easy installation in systems using copper, CPVC or PEX tubing. See below for important instructions for a safe, reliable and efficient installation.
Preparation
1. Shut-off power and water sources.
Before installing the Tank Booster, locate your power source and shut off the power to your water heater. For gas heaters, turn the gas valve off. If your power source is not next to your water heater, locate your breaker panel and switch off the power to your water heater.
Next, locate your main water source and shut off the water to the house. According to current codes, most water sources will be next to the water heater. For older homes, it may be located right outside the home, in crawl spaces or at the water meter. To drain the system, use the lowest water source in your home. This is usually your boiler drain at the bottom of your water heater.
Read More: How to Turn Off Main Water Valve for Plumbing Repairs
2. Prep the pipe.
Cut the pipe to disconnect the hot water outlet and cold water inlet on your water heater. Depending on your pipe type, use the proper tools for safe disconnections. We recommend using a ratchet cutter when cutting CPVC pipe so it does not shatter. No matter your pipe type, ensure the cut is even and the pipe is free of debris or sharp edges. Remove the old fittings on both the hot and cold water sources using pliers.
3. Check metal types.
Before installing your Tank Booster, check to see if you are joining any dissimilar metals. Please review the Tank Booster PRO spec sheet and compare materials to your water heater inlet and outlet threads. When the metals are dissimilar, use dielectric unions to prevent electrolysis, using Teflon tape to create a seal.
Installation
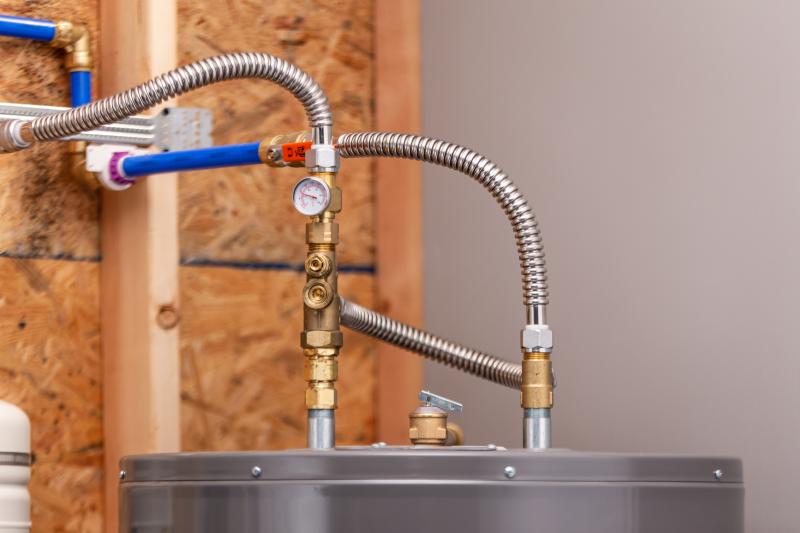
1. Adapter and mixing valve
Once your galvanized nipples are installed, use Teflon tape to connect the adapter to the hot water outlet. Then, connect the Tank Booster to the adapter, ensuring it is connected to the hot water side.
2. Tee and Connector
Thread the tee onto the cold-water inlet using a wrench, ensuring that both the threads of the mixing valve and the cold water tee are facing the back of the water heater to allow easy installation of the hose. Next, thread the water heater connector to the mixing valve and cold water tee. Then thread the temperature gauge onto the hot water outlet.
3. Cold water inlet connection
To connect the cold water inlet to the existing pipe, use a water heater connector like the SharkBite Max brass push corrugated water heater connector with ball valve.
The push-to-connect design of this SharkBite Max connector makes connecting to PEX, copper, CPVC, PE-RT or HDPE SDR-9 pipe fast and easy. To install, connect the threaded end to the cold water inlet and line up the ball valve end to the existing pipe. After cutting the pipe, use the deburr & gauge tool to deburr the pipe and ensure it is free of debris. Then mark the correct insertion depth according to the pipe insertion depth chart and insert the fitting until it meets the mark.
Read More: How to Properly Install SharkBite Brass Push Fittings
4. Hot water outlet connection
Use a SharkBite hot water heater connector to thread one side onto the hot water outlet. Using the push-to-connect side, push the connector onto your existing pipe using the same methods as the cold water inlet connection.
Read More: 3 Common SharkBite Installation Mistakes to Avoid
Post-Install Adjustments

After tightening both the hot and cold water connections and ensuring all fittings are secure, follow these instructions to complete the installation.
1. Let air out of the system
After installation, you need to let all the air out of the water heater tank. Turning the power on with air still in the tank will damage your water heater and burn the elements inside the tank.
First, turn your main water source back on. Do this very slowly to avoid hammering and cavitation. Then, let the air out of the tank. With all faucets off, use the handle on the water heater connector ball valve to slowly turn the water on. Once you hear that the tank is full, turn the handle back to its original position. Check that all the joints of your fittings are dry to ensure there are no leaks.
Next, let the air out of the system using a water source that does not have an aerator, such as a tub. Using a faucet with an aerator could clog it with debris that may have come loose. Run the tub for a couple of minutes to let the air out, then run another faucet to check that the air is out of the entire system.
2. Adjust the temperature
Before changing the temperature, ensure the power to the water heater is turned off, and for gas water heaters, that the gas valve is off.
After checking that the power is off, adjust the temperature of your water heater elements and thermostat to 140° F each. After setting the new temperatures on the water heater, turn the power on and adjust the temperature to 120° F on the mixing valve. Turn the Allen wrench counterclockwise to increase the heat and clockwise to decrease it.
Turn on a nearby water source, like a tub, to check that water is running through the temperature gauge. When the water reaches 120°F, tighten the locking nut using the Allen wrench and ensure the temperature remains constant.