How To: Replace a Bathroom Faucet and Drain

The cost to replace a bathroom sink faucet may be lower than you think, and you can often do the replacement yourself. Learn how to properly replace your bathroom faucet and drain with David Hunt, a master plumber of 35 years.
Whether you have a leaky sink or need an update, use SharkBite Max supply stops to help get the job done — no special tools, crimping, soldering or glue required. Follow the steps below for an easy, reliable way to replace your bathroom sink fixtures.
Learn More: Faucet/Shower Leak Repair
Preparation
Before changing your bathroom sink fixture or drain, shut off the water and remove the old sink components.
1. Water shut-off
First, locate your main water shut-off and turn the plumbing system completely off. According to current codes, most water sources will be next to the water heater. For older homes, it may be located right outside the home, in crawl spaces or at the water meter. Then drain the water out of your pipes by opening a nearby faucet.
Read More: How to Turn Off Main Water Valve for Plumbing Repairs
2. Removals
After ensuring your power and water are off, it’s time to remove the old sink components. We recommend you remove your drain before your faucet so you have more room to remove the old faucet head.
Pop-up Assembly
- Place a bucket below your drain or have a wet vac ready.
- Under the sink, unscrew the pop-up drain and the p-trap by hand.
- Disconnect the nut of the pop-up assembly with a wrench.
Drain
- Remove your drain before removing your old faucet. Depending on your drain configuration, you may need to disconnect your supply stops before cutting out the drain. For this application, David chose to disconnect the supply stops first.
- Cut the old drain out. If you have PVC pipe, use a reciprocating saw to cut the pipe at the base of the drain.
Faucet
- Using a wrench, disconnect the supply lines from the old stop valves. Then, remove the stops completely by cutting the PEX pipe with SharkBite PRO PEX cutters. Leave at least 1 or 2 inches of pipe so you can install new supply stops. You can choose to remove the stops before cutting out your drain.
- Loosen the faucet nut with a basin wrench then hand-loosen it until it’s completely disconnected.
- Be careful not to let the faucet head fall into the sink bowl since this could crack the porcelain.
- Pull the faucet head up and out of the sink and remove any plumber’s putty and debris from the countertop.
Bathroom Sink Faucet Installation
Faucet
- Assemble the faucet head according to the installation instructions that come with it. This will likely include tightening a thread, clamp and nut to the sink for a strong, lasting connection. Use either a basin wrench or the tools provided with the faucet kit to secure it.
- Since you have already cut the PEX stub-outs, deburr them using the SharkBite deburr and gauge tool. Ensure the pipes are free of any debris or shavings.
- Check the insertion depth chart for SharkBite Max fittings and measure and mark the pipe accordingly.
| SharkBite Fitting Size | Nominal Pipe Size | Pipe OD | SharkBite 1st Generation Insertion Depth | SharkBite Max Insertion Depth |
|---|---|---|---|---|
| 1/4 in. | 1/4 in. CTS | 3/8 in. | 13/16 in. (21 mm.) | |
| 3/8 in. | 3/8 in. CTS | 1/2 in. | 15/16 in. (24 mm.) | |
| 1/2 in. | 1/2 in. CTS | 5/8 in. | 15/16 in. (24 mm.) | 1 in. (25 mm.) |
| 5/8 in. | 5/8 in. CTS | 3/4 in. | 1-1/8 in. (29 mm.) | |
| 3/4 in. | 3/4 in. CTS | 7/8 in. | 1-1/8 in. (28 mm.) | 1-1/4 in. (32 mm.) |
| 1 in. | 1 in. CTS | 1-1/8 in. | 1-5/16 in. (33 mm.) | |
| 1-1/4 in. | 1-1/4 in. CTS | 1-3/8 in. | 1-7/8 in. (48 mm.) | |
| 1-1/2 in. | 1-1/2 in. CTS | 1-5/8 in. | 2-1/16 in. (52 mm.) | |
| 2 in. | 2 in. CTS | 2-1/8 in. | 2-3/16 in. (56 mm.) |
- If you are using escutcheons, slide them on the pipe first.
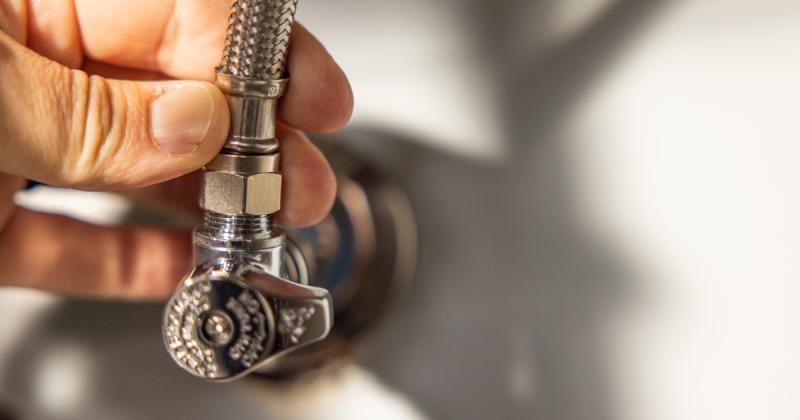
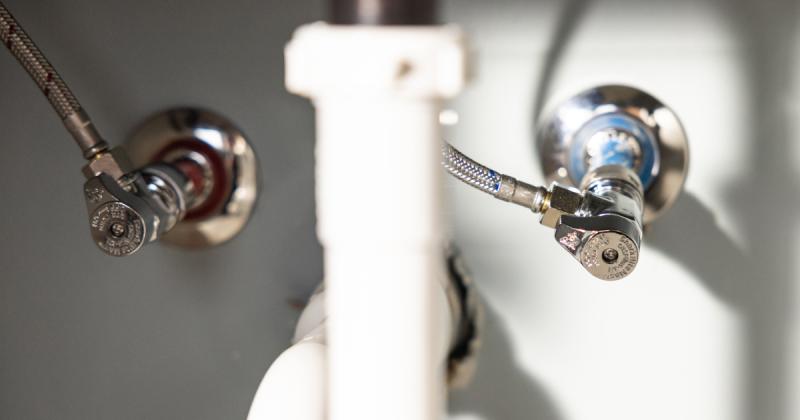
- Push the SharkBite Max angle stops to the mark and turn the valves to the off position.
- Unscrew the tops of the valves and attach the supply lines. Hand-tighten the lines, then use a wrench to finish the connection.
- Check that your supply lines are long enough to reach the supply stops and ensure that the hot and cold lines connect to their corresponding stub-outs.
Watch: How to Install a SharkBite Max Stop Valve
Pop-up Assembly
- Depending on your fixture, use either the gasket or plumber’s putty to seal the pop-up assembly to the sink.
- Line up the two holes in the assembly with the drain holes in the sink bowl. This will allow water to fill up the inner channel of the sink to prevent flooding.
- Under the sink, hand-tighten the nut to the pop-up assembly. Compressing metal to porcelain risks cracking the bowl, so secure it carefully.
Drain
- Glue the new PVC fitting to the original drain and thread on the drain arm using a beveled gasket and nut. You can alternatively use the nut included in your trap adapter kit.
- Hand-thread the p-trap to the drain arm. Ensure it is positioned correctly so that the water seal protects your home from sewer gases.
- To connect the pop-up assembly to the tubular p-trap, you need an extension tailpiece. We recommend buying one that is double-ended so you have two once you cut it.
- Slide a nut and beveled gasket onto the pop-up assembly followed by the extension tailpiece. With the tailpiece still on the pop-up adapter, mark the extension tailpiece where it levels with the insert point on the p-trap.
- Cut the tailpiece with a reciprocating saw according to your mark and slide it onto the pop-up assembly.
- Slide a nut onto the extension tailpiece and use it to connect to the p-trap. Ensure that the arm, p-trap and extension tailpiece pipes are all aligned and securely connected.
Turn the water on and check the plumbing system
After the installation, turn your main water valve back on slowly to prevent damaging your pipes.
To test your connections, set the pop-up assembly plug in the sink and plug it. Turn your supply stops to the on position and turn on the faucet, allowing the sink to fill up. You should see the water sputter since it is letting the air out of the system.
Then, check that the hot and cold-water lines are working properly. Once the sink has filled with water, turn your faucet off and let the water sit for 5 to 10 minutes, which ensures there are no leaks. Run your fingers along each connection point to double-check that everything is dry. Once you have completed your testing, unplug the drain.
Replacing your bathroom faucet? Get your materials ready.