How To: Replace a Toilet

Whether you need to switch to a dual-flush toilet or have a leak, SharkBite Max makes it easier to replace your toilet. Taylor Freeman, a journeyman plumber from Brothers on the Side, uses SharkBite Max and Eastman products to show you how to complete a fast, secure toilet installation.
When to Replace a Toilet
In this installation, the customer wanted to switch to a dual-flush toilet, which is more efficient and conserves water. You may also need a new toilet to prevent damage to your home. Here are some warning signs that it’s time to replace a toilet
Leaking. If streams of water are coming from the sides of your toilet, you need to replace your current connection or even your entire toilet. SharkBite Max angle stops and Eastman connectors make this process simple and secure so you don’t have to worry about another leak.
Rocking. If you ever feel like your toilet is rocking or that it isn’t level, you will need to re-set it or replace it with a new toilet. It is likely not set properly or has become loose, indicating there is something wrong underneath.
Cracked bowl. If you notice any cracks in the porcelain, you may need a new toilet. Even small cracks can cause the entire bowl to split and cause major damage. This is a sign that the toilet has been damaged and is unsafe to continue to use.
Preparation
Before installing your new toilet, properly prepare your plumbing system with these simple steps.
1. Water and power shut-off
First, locate the power to your water heater and shut it off. This will prevent your water heater from burning the elements inside. Then, locate your main water shut-off and turn the plumbing system completely off. You can do this on the street or where the water main enters your home, which is usually near the front wall of your home that faces the street.
Read More: How to Turn Off Main Water Valve for Plumbing Repairs
2. Drain cold water supply
Now it’s time to get the water out of the system. Since your toilet uses cold water, that line is what you need to drain. To do this, find a low point in your home, such as a downstairs faucet, and turn on the cold water. Then, turn on a different faucet to prevent airlocks, or trapped air, in your system. We recommend using a faucet on the same floor you’re working on.
3. Flush and drain toilet
To finish removing the remaining water, flush your toilet. You may also need to use a wet vac to vacuum up the water from inside the bowl and tank.
How to Disconnect the Toilet
Now that you’ve drained the system, it’s time to disconnect and remove the old toilet. Start by loosening the top nut of the supply line and cutting out the old supply stop. Since this house had CPVC, Freeman used a pipe cutter to cut out the stop.
If your toilet has caulking on the bottom, take a razor and cut around the base to loosen it from the floor. Then, pop off the caps of the flange bolts and unscrew the bolts from each side of the toilet. Lift the toilet away and be sure to scrape off the old wax ring from the floor.
How to Install the New Toilet
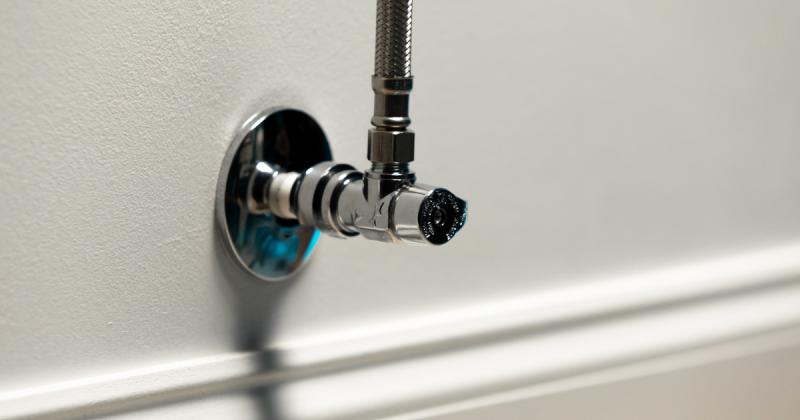
1. Connect the SharkBite Max angle stop
Perfect for tight spaces, SharkBite Max is the next generation of SharkBite push-to-connect fittings with half the insertion effort and double the pressure rating compared to the first-generation fittings. This makes installation hassle-free and much quicker compared to traditional methods. SharkBite Max angle stops have an innovative push-to-connect design, which makes any fixture connection simple. They are compatible with PEX, copper, CPVC, PE-RT and HDPE SDR-9 pipe and are offered in multiple sizes and finishes.
Watch: How To: Install SharkBite Max Fittings
To install the stop valve, use the SharkBite deburr and gauge tool to deburr the pipe. Then, clean the stop and ensure it is free of debris. Using the insertion depth chart, measure and mark the depth on the pipe and push the fitting to the mark. By marking the pipe, you can easily gauge if you have fully inserted the fitting.
| SharkBite Fitting Size | Nominal Pipe Size | Pipe OD | SharkBite 1st Generation Insertion Depth | SharkBite Max Insertion Depth |
|---|---|---|---|---|
| 1/4 in. | 1/4 in. CTS | 3/8 in. | 13/16 in. (21 mm.) | |
| 3/8 in. | 3/8 in. CTS | 1/2 in. | 15/16 in. (24 mm.) | |
| 1/2 in. | 1/2 in. CTS | 5/8 in. | 15/16 in. (24 mm.) | 1 in. (25 mm.) |
| 5/8 in. | 5/8 in. CTS | 3/4 in. | 1-1/8 in. (29 mm.) | |
| 3/4 in. | 3/4 in. CTS | 7/8 in. | 1-1/8 in. (28 mm.) | 1-1/4 in. (32 mm.) |
| 1 in. | 1 in. CTS | 1-1/8 in. | 1-5/16 in. (33 mm.) | |
| 1-1/4 in. | 1-1/4 in. CTS | 1-3/8 in. | 1-7/8 in. (48 mm.) | |
| 1-1/2 in. | 1-1/2 in. CTS | 1-5/8 in. | 2-1/16 in. (52 mm.) | |
| 2 in. | 2 in. CTS | 2-1/8 in. | 2-3/16 in. (56 mm.) |
SharkBite Max Push-to-Connect Stop Valves
2. Prep the toilet
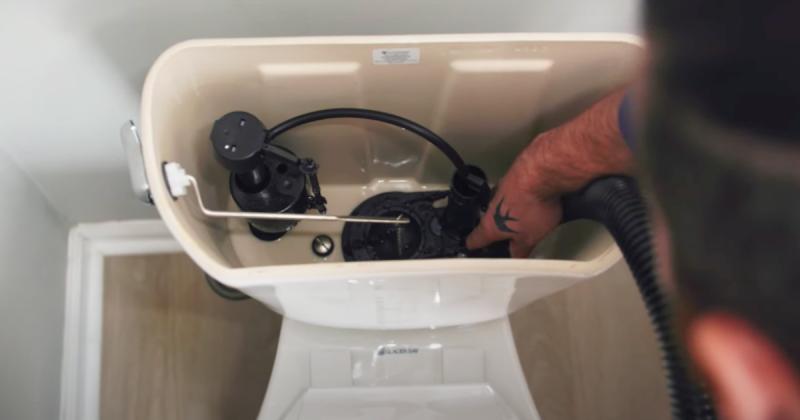
After installing your angle stop, put a new wax ring on the base, which creates a watertight seal between the toilet and the sewer pipe. Then, hand-tighten the tank bolts on the back of the toilet so the tank is securely and evenly set on the bowl of the toilet. Before moving on, check for any rocking and re-tighten the bolts accordingly.
Lastly, thread the new supply line onto the tank by hand-tightening the connector. Do not use any tools for this step, as tools could overtighten the bolts and crack the toilet. For this install, Freeman used an Eastman toilet supply line, which are available in all sizes and connection types. Eastman is part of RWC’s family of brands and seamlessly connects to SharkBite products. Forged from a solid brass body, Eastman products provide a long-lasting watertight seal.
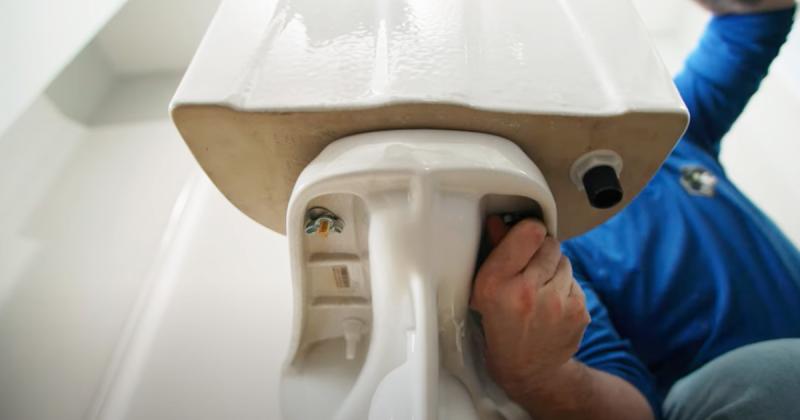
3. Set the toilet
Now it’s time to pick up the toilet and slowly and carefully set it. For a secure, proper connection, ensure the flange bolts go through the holes at the bottom of your toilet. Then, press the toilet down to secure to the wax ring. Once the toilet has compressed the wax ring, you cannot adjust the toilet again unless you get a new wax ring.
4. Secure the connection
To secure the toilet to the floor, place the toilet bolt caps on the bolt, then the metal washer then the nut. Hand-tighten these bolts in synchronous to avoid an uneven connection. Then, finish tightening them with tools and stop when there is no rocking.
After securing the toilet to the floor, connect the toilet supply line to the angle stop. Use tools to finish tightening this connection and leave the stop turned off until the system is checked.
Turn the water on and check the system
After the toilet installation, turn the main water valve back on slowly, which prevents damaging your pipes. Then, bleed out the air pockets by opening a faucet and letting the water run until it runs smooth without sputtering or spitting.
Once the water flow is steady and free of air bubbles, turn on your stop valve and let the toilet tank fill with water. Then, check for leaks by flushing the toilet several times and feeling around the bottom of the toilet for water. Lastly, put the toilet caps on the bottom bolts.